
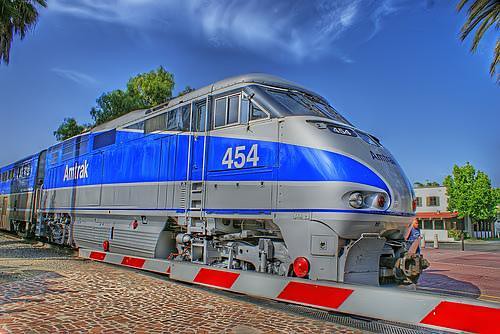
 I took this picture in San Juan Capistrano. I took it right outside the mission! Then I used the HDR Method to make it look like this;-)
I used Photomatix! At the time I had Adobe CS2!
What is HDRI?
HDRI means High Dynamic Range Imaging. HDRI is today often used in 3D light rendering and also video post-production. Since Photoshop CS2 supports 32 bit HDR image formats also photographers start to experiment with HDRI. We do not plan to give an in depth explanation of HDRI but rather talk about the basics and show how HDRI can be used for artistic images today.
So what is HDR (High Dynamic Range)?
The dynamic range defines the contrast ratio the eyes can see, the cameras can capture or a print on paper can show. Best we state some numbers (mainly taken from here):
100,000:1 A scene showing the interior of a room with a sunlit view outside the window
1000:1 can be captured by some digital cameras (may even be optimistic if we recognize that the dynamic range is limited by noise)
256:1 Print on glossy paper with a dmax of about 2.4
50:1 Print on matte paper with a dmax of 1.6
Let's think of high dynamic range starting beyond 1000:1 (means beyond what any printer and even most digital cameras can produce).
What is the relation between bit depth and HDR?
If you have an image with high bit depth this does not mean that you automatically have also a
HDR image. Otherwise you would take low DR images and just convert them to a higher bit depth. But on the other side the bit depth limits how much DR you can represent in the data:
8 bit: 256:1 (clearly not a format usable for HDR)
16 bit: 65,000:1 or 32,000:1 (as we understand Photoshop is only using 15 bit internally)
32 bit: Here floating point numbers are used and for our practical purpose there in no real limit
How can we capture HDR images?
Right now most digital cameras capture only a maximum of 1,000:1 (as said this even maybe optimistic). While there are many developments to create sensors that can capture a higher dynamic range (e.g. Fuji in the S3) the main method today is to combine multiple exposures (2 - 10). As always this creates its own problems:
Moving objects (results in so called "ghosting")
Camera move (requires image alignment)
In case of stationary objects and a sturdy tripod quite good HDR images can be created.
Why creating HDR images when prints cannot reproduce the contrast?
Once you have created a HDR image you need to find a method to compress the high dynamic range in a way that it fits into the range of a print. This procedure is called Tone Mapping.
Tone Mapping
Tone Mapping is a way to reduce a high contrast image to a much lower contrast one. It always will be some sort of compromise. That is why there are many different algorithms for Tone Mapping and it is very much dependent on the concrete image how good some of these methods will work.
Photomatix by MultimediaPhoto is on the market for some time. We played with it also in the past but never got really excited for our own artistic work. This changed recently. We are not sure whether this is related to the new version 2.3 or a better understanding in how to use the software (likely both). The following will give an idea how we use Photomatix and is not a kind of manual.
Creating a HDR image in Photomatix
There are quite a few ways to create a HDR image in Photomatix. Normally you should have at least 3 exposures with about 2 f-stops difference (-2, 0, +2 should often work fine). Most of the time you convert the RAW files in your RAW converter of choice (make sure you have the same white balance for all shots) and later combine them in Photomatix. But there is also a way to start directly from the RAW files in Photomatix.
We use in our sample a three exposure sequence (Canon 1Ds, 4, 8, 20 seconds). The image(s) we use were photographed at Fort Point in San Francisco. The scene is really dark and it is quite a challenge not to overexpose the window. We may have gotten a decent result from one single image in the sequence but we would have a hard time to create the final look like in Photomatix.
We create the HDR file using the Automate->Batch feature:
In batch you can automatically process multiple sets of RAW files and create HDR images (even ready tone mapped TIFFs or JPEGs). In our case we only created one single HDR file. Once the HDR file is generated we open the resulting HDR file.
Looks ugly, right? What is gone wrong? Fortunately there is nothing wrong here. Without Tone Mapping a HDR image cannot show on screen properly because it can have a dynamic range way beyond the screen capabilities. Also an automatic Tone Mapping does not make sense because there is no single and even less automatic way to tone map an image.
Because we want to print the final image we need to process the HDR file in the Photomatix Tone Mapping dialog.
Note: We have reviewed before the Photomatix Photoshop Tone Mapping plugin. But we actually did not use the plugin for HDR files. This was not really tone mapping but should be called tone re-mapping. Nevertheless it is an effective way to improve images.
Photomatix provides today two different tone mapping methods:
Detail Enhancer
Tone Compressor
Both can be useful for certain types of images. For our image we want to get a certain gritty look and here the "Detail Enhancer" at 100% Strength is very useful.
Notes of caution using the "Detail Enhancer" method:
Some images may show halos at high contrast edges
The preview is not always 100% correct (but good enough for practical purposes)
Once the image is processed we save it as a TIFF file.


